
 As the backbone of modern networking, RJ45 Connectors play a pivotal role in establishing secure and efficient connections. We created an incredible instructional guide that takes you step-by-step on how to install RJ45 Field Installable Connectors for large Ethernet Cables such as CAT 7, CAT 6, and Profinet cables. Within the video and blog post provided, you will find a wealth of information on the importance of precise installation, troubleshooting tips, and future-proofing strategies for optimal network performance.
Author & Narrator: TPC Engineer, Jared Raish
Key Takeaways
- Precision Installation: Our engineer emphasizes the importance of precision when installing RJ45 connectors on large Ethernet cables. Quote from the creator: "A secure connection starts with meticulous installation."
- Troubleshooting Tips: Learn the art of troubleshooting common issues with RJ45 connectors. The engineer shares insider tips to tackle connectivity problems effectively.
- Future-Proofing Strategies: Discover how to future-proof your network by selecting the right RJ45 connectors. The engineer unveils the secrets to ensuring your connections stand the test of time.
Step-by-Step Instructions - RJ45 Installation
- Prepare Your Tools: Gather the essential tools - cable stripper, crimping tool, and the RJ45 connector kit.
- Stripping the Cable: Carefully strip the outer covering of the Ethernet cable, exposing the individual wires. To begin, we will remove the cable jacket at a 35mm measurement from the end of the cable using a blade or TPC Cable Stripper (like our 91403) we’ll cut around the circumference of the cable at our measurement. Be sure not to extend the blade too far! Once our cut is made, we’ll gently bend the cable to verify we’ve cut the full circumference of the cable and separate the jacket to be removed from it.
- Trim Shielding: To begin trimming the shielding, we’ll pull the braided shield back to the cable jacket then use flush cutters along the length of the shielding to score the shield, then continue to trim around the edge of the cable jacket to bring the shielding to length. Next, we’ll separate the pairs and score the foil shield at the edge of the braided shield. Once this is done, we can now tear the foil shield around the circumference of the pair to remove the pair shielding. Be sure not to nick the insulation at this point!
- Untwist Pairs: For ease of termination, we untwist the individual pairs while trying to keep the white conductors close to their original-colored pair. We find it easier to separate the pairs in the four cardinal directions coming out of the cable. This separation is crucial for easily identifying each pair.
- Reference Pin Assignment and Determine Wiring: Utilizing the included conductor sheet attached to the connector, determine your wiring. The relevant rows are depicted by the arrows pointing to their relevant inspection holes on the body of the connector. As this is being said, an unfilled box begins to appear on the top row of inspection holes and the relevant conductor depictions, then changes to the bottom row of inspection holes and relevant conductor depictions.
- Load Wires: To populate the connector, we’ll begin by loading the longer row of conductors, or the top row of the conductor sheet. To do so, begin sliding the conductors through the appropriate holes. Be careful not to separate the connector from the cable too far, or you’ll pull out conductors that you’ve already loaded! You may find that having all the conductors the same length makes loading the conductors difficult. We’ve found it easier to trim these conductors diagonally to make them varying lengths. Doing so allows you to load the longer conductor first and continue decreasing the length.
- With this row populated, we’ll begin populating the other row by “clipping” the conductors into place via the comb. To do so, simply straighten the conductors into their proper location using your fingernail to fully seat them into their location. You may notice some conductor crossing near the cable jacket – that’s okay as long as the conductors are straight in the connector body.
- Apply Strain Relief: Take the black strain relief around to the front side of the cable. Using your thumb, press the strain relief into place. Now, using a vice or pliers, continue compressing the strain relief to snap it into position. Inspect the strain relief to guarantee that it’s in the proper location.
- Trim Extra Length from Conductors: Using flush-cutters, snip the extra conductor length to the end of the face of the conductor seat.
- Apply Housing: Using the stepped profile on the two housing halves, line up the halves. Using your thumbs and pointer fingers, begin compressing the two halves together, beginning the seating process.
- Crimp Housing: Using a vice or pliers, continue compressing the two halves of the housing to properly seat the insulation displacement contacts into the conductors.
- Verify Crimp: Inspect the connector, verifying that there are no gaps between the two halves of the housing material. At this point, the connection should be securely made and able to be tested with a standard network cable tester.
Resources & Tools
In our experience, we suggest always investing in high-quality connectors and tools. Cutting corners may lead to unreliable connections and network issues. Precision and quality go hand in hand when working with RJ45 connectors.

- Cable Stripper: A tool designed to strip the outer covering of Ethernet cables without damaging the internal wires.
- Crimping Tool: Essential for attaching the RJ45 connector securely to the cable.
- RJ45 Connector Kit: Includes connectors, boots, and other accessories necessary for the installation process.
FAQ’s
Q: Can I use any RJ45 connector for large Ethernet cables?A: It's crucial to choose connectors specifically designed for large cables to ensure optimal performance.
Q: How do I troubleshoot a faulty RJ45 connection?
A: Check the wiring sequence, re-crimp if necessary, and inspect for any visible damage to the connector.
Q: Can I reuse RJ45 connectors?
A: While possible, it's recommended to use new connectors for a secure and reliable connection.
A: With proper installation, RJ45 connectors can last for many years, but periodic checks are advisable.
Q: Do I need special tools for RJ45 installation?
A: Yes, invest in a cable stripper and a quality crimping tool for a successful installation.
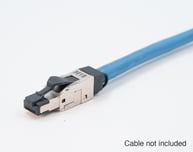
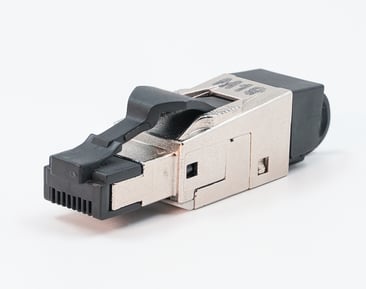
TPC Wire & Cable’s RJ45 Connector for large-diameter cable is designed for use with the TPC Industrial Ethernet Cable Family. Featuring a staggered conductor comb to maximize space, fully shielded zinc die-cast housing, and a simple two-piece crimp design, this RJ45 makes the perfect connector for industrial applications!


